Drawn: ‘Death Is Not The End’

DeathIsNotTheEnd_3

Happy Easter!

Here in Australia we celebrated Easter over the weekend. Though it’s a time that some people like to associate with chocolate eggs (and who doesn’t love chocolate eggs! :)) and rabbits, some people also like to spend this time of year remembering how Jesus died and came back to life again.

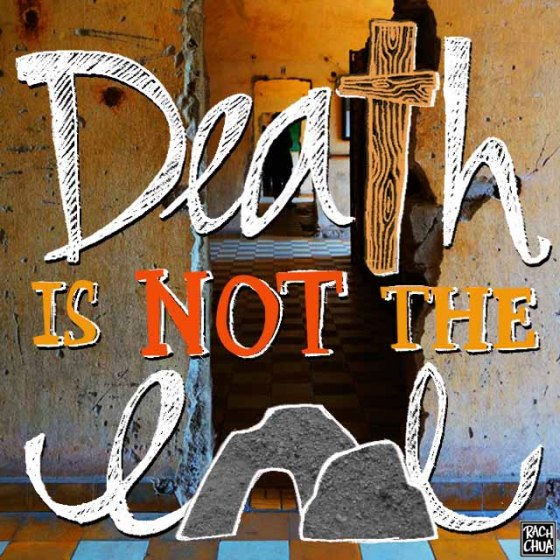
I wanted to share with you a postcard design I did last year during Easter. The brief was to create a design around the phrase “Death is not the end”. As I wanted this phrase to reflect how Jesus died I turned the “T” into a cross – which is what Jesus was killed on. But I also wanted the design to reflect how Jesus came back to life I turned the “ND” of “end” into pictures of an open tomb – which represent Jesus’ empty grave (empty because he was no longer dead!).

It took a few attempts to get the design correct on paper but eventually I ended up with the sketch below:

DeathIsNotTheEnd_2

I scanned this sketch and using Photoshop, I coloured it and ended up placing it over a picture I shot when I was in Cambodia.

The picture was taken at Tuol Sleng Genocide Museum, where many Cambodians died horrific deaths during the Cambodian Genocide. It was a picture of a place which represented, for me, how devastatingly painful, final and hopeless death can seem.

The phrase ‘Death is not the end’ however, represents the hope we can have in Jesus. Jesus died so that we have hope of a new life after death (which you can read more about HERE !). Death does not have to be final and hopeless!

But back to the design – I was and still am pretty pleased with how it turned out!

DeathIsNotTheEnd_1

Thank you for letting me share with you another piece of my artwork!

I hope you have a great week! x


Hooked: Rabbit Lovey

Bunny Lovey_3

Today I wanted to share with you something I made last year for my friends’ toddler – a rabbit lovey! This lovey was made up of a few different patterns I found online.

The head and arms of the rabbit were taken from the All About Ami Spring Bunny Pattern which you can find HERE. The blanket part of the lovey was a regular granny square pattern. The scallop edge I used was from a blanket edging I saw on the Maybe Matilda blog which you can find HERE.

Bunny Lovey_1

Bunny Lovey_2

Bunny Lovey_4

Bunny Lovey_5

I was really happy how a mix and match of patterns could create something new!

Have you ever created something by mixing parts of different patterns?


FREE PATTERN: Sleeping Neko Atsume Kitty

NekoAtsume_8

I’m pleased to present to you today my pattern for a sleeping Neko Atsume kitty! I’ve made my kitty (and these instructions for) Marshmallow. However, you may want to try and adapt this pattern to suit the colour and patterns of other Neko Atsume kitties!

Materials:

  • 3mm crochet hook
  • White Yarn
  • Grey Yarn
  • Fibre Fill
  • Grey Felt
  • Black Embroidery Thread
  • Hot Glue Gun

This pattern is in written in US terms

HEAD:

With white yarn.

Chain 6 (Foundation Chain)

R1: Starting with the second chain from the hook, Sc 4 into the back loops. Sc3 into next sc. Turn and Sc5 into front loops. (12sts)

After R1, your crochet should look like this:

NekoAtsume_Instructions_7

R2: *1sc, inc* rep 6 times (18sts)

R3: *2sc, inc* rep 6 times (24sts)

R4-5: sc24 (24sts)

Embroider eyes to head.

R6: *2sc, dec* rep 6 times (18sts)

R7: *1sc, dec* rep 6 times (12sts)

Stuff head.

R8: dec 6 times (6sts)

Cast off, sew in end.

NekoAtsume_Instructions_8

LEGS (Make 3):

With grey yarn

R1: sc5 into a magic ring

R2: inc, 1sc, inc, 1sc, inc (8sts).

R3-5: sc8

Cast off, sew in ends.

BODY:

With white yarn.

R1: We will be creating the body from the legs.

NekoAtsume_Instructions_1

a) Starting from the back leg, sc4 across the front. Chain 5.

NekoAtsume_Instructions_2

b) Sc4 across the front of each of the other 2 legs.

NekoAtsume_Instructions_3

NekoAtsume_Instructions_4

c) The last 17sts make up the ‘front’ of the body. Crochet 17sts along the ‘back’ of the body.

d) You will now have a round consisting of 34sts. It should look like this:

NekoAtsume_Instructions_5

R2-3: sc34 (34sts)

R4: Dec, sc14, dec, sc16 (32sts)

R5: *2sc, dec* rep 8 times (24sts)

R6: sc24 (24sts)

R7: *2sc, dec* rep 6 times (18sts)

Stuff body.

R8: *1sc, dec* rep 6 times (12sts)

R9: Dec 6 times (6sts)

Cast off, sew in end. The body will look like this.

NekoAtsume_Instructions_9

EARS (Make 2):

With grey yarn.

R1: sc3 into a magic ring

R2: 2sc in each sc (6sts)

Cast off. Leave tail for sewing.

TAIL:

With grey yarn.

R1: sc5 into a magic ring.

R2-10: sc5 (5sts)

Cast off. Leave tail for sewing.

ASSEMBLY:

Sew ears to the face.

NekoAtsume_Instructions_10

Sew the tail to the body.

NekoAtsume_Instructions_11

Attach enough yarn at the back of the head so that you can sew it onto the body. I just attached the yarn with a knot.

NekoAtsume_Instructions_12

Sew the head onto the body. I chose to sew the head at a slight angle so that the kitty looks more like it is curling into a ball.

Glue on the kitty’s muzzle (after embroidering its nose and mouth) to the face with a hot glue gun.

After this – you will have your very own Neko Atsume kitty!

NekoAtsume_6

I hope you like this pattern and enjoy making your own sleeping Neko Atsume kitty. Do you think you’ll make Marshmallow, or will you change the colours and make another kitty? Whichever kitty you make, please share your photos! I’d love to see them!

Marshmallow from Neko Atsume is Copyright of Hit-Point Games(2015). This pattern is an original pattern by Rachel of Drawn and Hooked (March 2016). Please do not claim this pattern as your own. You may link to this pattern but please do not reprint it on your site, sell or distribute it, or sell items made from this pattern. Thank you!

Hooked: Marshmallow from Neko Atsume

NekoAtsume_6

I’m excited to share with you today something I created last week – Marshmallow the kitty from the ridiculously cute (and addictive) Japanese game ‘Neko Atsume’! I’ve been playing the game for a while now and thought it’d be fun to try and make my own Neko Atsume kitty.

NekoAtsume_7

Of all the different poses the cats make in the game, the sleeping cat pose is my favourite so I decided to design just that! I chose to make ‘Marshmallow’. It took a bit of trial and error (I had to pull apart some pieces) but overall I’ve been really happy with how Marshmallow turned out!

NekoAtsume_5

I’ve enjoyed sharing Marshmallow with you – and I’m pleased to say that next week I’ll be sharing the pattern I wrote for Marshmallow! Stay tuned! 🙂

NekoAtsume_4

Hooked: Meerkats

RachelChua_1

Today I thought I’d share with you something I crocheted over a year ago but never posted about – mum and her two baby meerkats! I created these little guys in 2014 for a competition. Apart from the competition’s website – they’ve never seen ‘the light of day’.

RachelChua_2

For mum, I used the technique of interchanging yarns to create the stripes on her back and the dark patches around her eyes. For the babies, as they were so small, it was easier to create these markings by gluing pieces of felt.

RachelChual_3

My favourite part of this project was creating the baby meerkats. It’s difficult to tell from the photos, but each one had a different shade of brown/tan.

This little family now lives in storage somewhere around my home… I hope you’ve enjoyed seeing them!

Hooked: Crochet Car

Amigurumi Car_8

Recently I was looking for an amigurumi pattern that was ideal for a toddler. I found this car pattern on the ‘Nephithyrion’ blog. You can view and download it from HERE.

The amigurumi car is made up of several flat pieces with an exception of the tyres.

Amigurumi Car_2

As the amigurumi car was going to be a gift for a toddler, I crocheted circles for the headlights instead of using buttons.

I sewed the tyres onto the flat car sides then joined the pieces together using single crochet stitch. I left a small opening for stuffing.

Amigurumi Car_5.jpg

I put a lot of stuffing in the car! My amigurumi car ended up looking puffier than the one in the pattern but I was pleased with how firm it was.

I ended up sewing a small rectangle number plate and sewing in its owner’s name. 😉

Amigurumi Car_3

And my amigurumi car was done and ready for its new owner!

Amigurumi Car_4.jpg

Amigurumi Car_1.jpg

Amigurumi Car_7

It was a fun amigurumi to crochet and has opened me to crocheting more than just round animal amigurumi characters. Have you crocheted an amigurumi car before? Did you use this pattern or another?

Hooked: Chinese New Year Monkey

CNY Monkey_5

Happy Chinese New Year again! As an amigurumi enthusiast its become an annual tradition to pick up my crochet hook every time the Lunar New Year comes around and create Stephanie of All About Ami’s latest animal pattern.

This year was the Year of the Monkey! You can find this adorable pattern HERE.

CNY Monkey_2

I made some small changes to my monkey. Apart from changing his more life like colours to red and yellow/gold (traditional festive Chinese colours) I also sewed my monkey a smiley mouth and glued (instead of painted) on his rosy cheeks. This monkey pattern also had an option for adding wires to his body (so he can clip onto objects). However, I opted to just keep mine stuffed. So that his tail would not droop, I only made it shorter – at 34 rows.

CNY Monkey_4

As you can see, at 34 rows – even without a wire the tail is springy enough to stand on its own. The monkey is also still able to sit on its own too.

CNY Monkey_7

One of my favourite features of this Monkey is his banana. I almost want to make a bunch of them!

CNY Monkey_3

Overall, this Monkey is a great amigurumi pattern and was enjoyable to make.

CNY Monkey_1

He now joins the other Chinese New Year animals I have also made from Stephanie’s blog!

CNY Monkey_6

Have you made the Chinese New Year monkey this year as well?

Drawn: Monkey King

Monkey King


Happy Chinese New Year!

It’s been a long time since I’ve posted anything to do with drawing – but I thought I’d share with you a monkey I illustrated recently.

About a month or two ago I was asked to draw the ‘Monkey King’ from a classical Chinese novel called ‘Journey to the West’. I had never heard of this story (and still don’t know much about it!) but illustrated my own version of the ‘Monkey King’ after seeing how other artists had illustrated him.

Unfortunately this illustration didn’t end up being used for the project it was intended for – so here it is on my blog – just so it doesn’t remain forever in the archives of my computer!

Hooked: Patchwork Crochet Bag

Patchwork Bag_7

In late Spring (November), I decided I wanted to crochet a bag to use for the Summer. I looked at Pinterest and Instagram for inspiration and patterns. I wanted something that looked fresh and would be simple to make. In the end I settled for a Stylish Easy Crochet’s Patchwork Crochet Bag pattern which you can find HERE. The great thing about this pattern is that it is made up of just squares. You can make your bag small or big, depending on the size and number of squares you use.

I wanted a bag that would be able to carry my wallet, keys, phone, diary and other bits and pieces – so I decided to make a 13 square bag.

For each square, I used Craft Passion’s Solid Granny Square Crochet Pattern which you can find HERE. I then joined the squares using single crochet stitch. For the handles I just did a chain stitch (which I made wider with about 6 rows of sc).

I wanted a colour scheme that would be colourful but not of a specific colour scheme so that it could match whatever I wore. I found that making the majority of squares neutral colours (white, light grey, dark grey and black) helped achieve this.

All the yarns I used were acrylic. I was initially skeptical about the durability of this material – but after using this bag for about 2 months I have to say it is pretty sturdy! Yes, the handles have curled a bit and some of the squares have some pilling (see below) but other than that the bag has been very strong and reliable. At times I have loaded it up with a water bottle too – the bag can take quite a bit of use!

DSC00829

Patchwork Bag_1

One thing I have done to help with the durability of the bag though is sew a fabric pocket to sit inside it. Initially I tried to sew a lining into the bag, but with my limited sewing skills, this proved too challenging. I have found a very simple fabric ‘pocket’ is enough to stop small objects like my keys poking out of holes.

Patchwork Bag_6

I’m surprised my simple bag has lasted so long and would definitely recommend this pattern to anyone looking to crochet a bag! Do you think you’ll make a patchwork bag?

FREE PATTERN: Everywhere Bear

Everywhere_Bear_2

Last week I posted about my trip to Cambodia to see first hand the impact of the ‘Operation Christmas Child’ Project. I mentioned that the trip inspired me to create a quick, easy and cute amigurumi bear pattern for this project. The bear is the perfect size for cuddling and fitting into a shoe box without taking up too much space (so other things can be packed).

A frustrating thing I find with crocheting amigurumi is that they are not projects you can take on the go (whether it be catching a train or away on holiday). Pieces often require stuffing and closing – so unless you’re willing to carry around fibre fill too – amigurumi is too complicated to transport. So I have designed this pattern so that all the pieces remain open and only need stuffing and closing when being assembled.

I have also kept this pattern simple – so much so that you could even memorize it if you wanted to!

It’s difficult to find time to set aside to make items for projects such as Operation Christmas Child (or other charities you may support). However, I hope an easy and transportable pattern like this will enable you to make the most of otherwise idle time!

Everywhere Bear is approximately 17.5cm (about 7 inches) long. This pattern is written in US terms.

MATERIALS:

  • Yarn
  • Black Yarn (for sewing features)
  • 9mm safety eyes (optional)
  • Fibre-fill
  • Darning Needle
  • 3.75mm Hook

HEAD:

R1: Sc 5 into Magic Ring

R2: Sc 2 into each sc (10sts)

R3: *Sc 1, 2 sc in next sc*, rep 5 times (15sts)

R4: *Sc 2, 2 sc in next sc*, rep 5 times (20sts)

R5: *Sc 3, 2 sc in next sc*, rep 5 times (25sts)

R6: *Sc 4, 2 sc in next sc*, rep 5 times (30sts)

R7: *Sc 5, 2 sc in next sc*, rep 5 times (35sts)

R8-R15: Sc35

R16: *Sc 5, dec 1 sc*, rep 5 times (30sts)

R17: *Sc 4, dec 1 sc*, rep 5 times (25sts)

R18: *Sc 3, dec 1 sc*, rep 5 times (20sts)

R19: *Sc 2, dec 1 sc*, rep 5 times (15sts)

Cast off. Leave a long tail for attaching to body later.


BODY:

R1: Sc 5 into Magic Ring

R2: Sc 2 into each sc (10sts)

R3: *Sc 1, 2 sc in next sc*, rep 5 times (15sts)

R4: *Sc 2, 2 sc in next sc*, rep 5 times (20sts)

R5: *Sc 3, 2 sc in next sc*, rep 5 times (25sts)

R6-R12: Sc25

R13: *Sc 3, dec 1 sc*, rep 5 times (20sts)

R14-15: Sc20

R16: *Sc 2, dec 1 sc*, rep 5 times (15sts)

Cast off. Weave in end.


ARMS/LEGS (Make 4):

R1: Sc 5 into Magic Ring

R2: Sc 2 into each sc (10sts)

R3-11: Sc10

EARS (Make 2):

R1: Sc 5 into Magic Ring

R2: Sc 2 into each sc (10sts)

R3: *Sc 1, 2 sc in next sc*, rep 5 times (15sts)

R4-R5: Sc15

Cast off. Leave tail for attaching to body.


ASSEMBLY:

1) Sew on the Bear’s face. This is how I sewed mine, but you might like to try different expressions.

Everywhere_Bear_4

2) Stuff the head and body and sew them together.

3) Attach the ears to the Bear’s head.

4) Attach the arms and legs. I chose to attach them ‘flat’ to the sides of the Bear.

Everywhere_Bear_3

After this – you’ll have your very own ‘Everywhere Bear’! I hope you like the pattern. If you make one, I would love to see it! I would also love to hear of the different places you may have crocheted your bear.

Happy crocheting!

The ‘Everywhere Bear’ pattern is an original pattern by Rachel of Drawn and Hooked (January 2016). Please do not claim this pattern as your own. You may link to this pattern but please do not reprint it on your site, sell or distribute it, or sell items made from this pattern. Thank you!